How to Create a Smart Pop-up
With our widget builder, you can create smart pop-ups that are shown to visitors only as specified by a certain scenario. Make a personal offer at the right time, help your client choose a product or service, or collect subscribers to interact with them using the SendPulse service.
You can choose a pre-made template and use it right away or edit it according to your needs.
Let's talk about how to create a widget using a template and set up its appearance, message text, target action, and display condition.
Go to your project in the "Display scripts" tab, and click Create pop-up.

Choose a Template
A template is a widget with predefined appearance and target action settings. You can choose a pop-up template from the list of popular or festive templates based on your widget type or purpose.
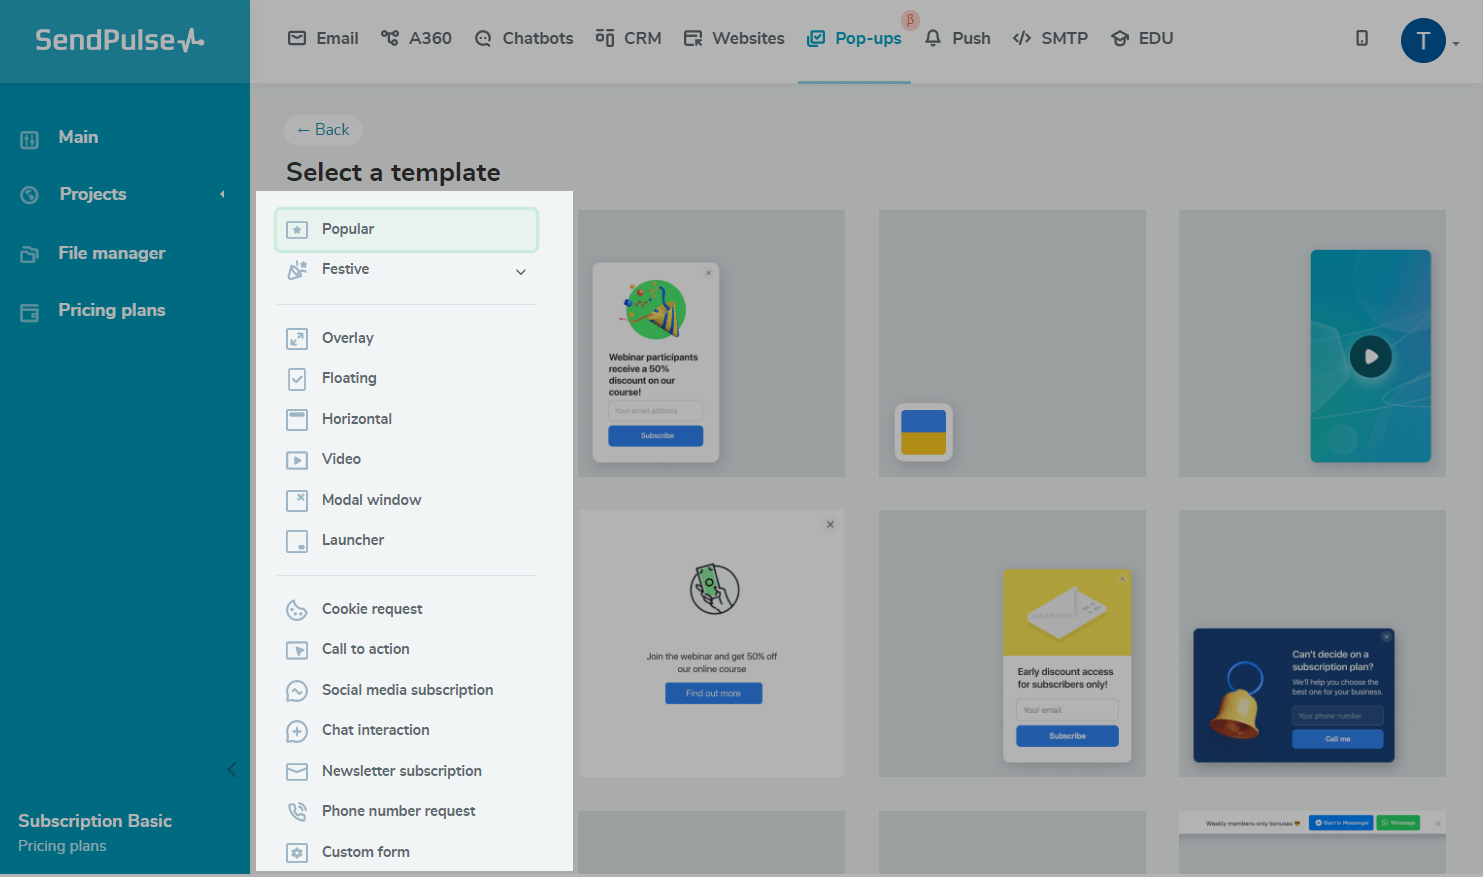
By Pop-up Type
Select a template based on your preferred widget appearance.
| Overlay | A block that covers the entire site page. Users need to close the pop-up window to interact with your site page content. |
| Floating | A floating window placed on the left or right of the browser window when a user scrolls the page. Users do not need to close it to interact with your site page content. |
| Horizontal | A horizontal window that can be placed at the top or bottom of the page. Users do not need to close it to interact with your site page content. |
| Video | A window that plays YouTube videos. If you select an automated scenario, the video will start playing after any user action on the page.
If you select the “Activated when click” option, users will see a video preview once the page is loaded, and the video will start playing when they click the pop-up. On mobile devices, video pop-ups are always played only when users click them. |
| Modal window | A block located in the center of the page. All the other site page content is darkened and not clickable. Users need to close the modal window to interact with your site page content. |
| Launcher |
A small static icon pinned to the selected corner of the page. When users click it, a certain action is triggered, for example, another pop-up opening or user redirection to the specified site page. Read also: How to Create a Launcher Pop-up. |
| NPS |
A block with a scale and a comment box that allows you to collect feedback from users and monitor how satisfied they are with a product or service. Your rating options can be displayed as numbers, stars, and emoji. Read also: How to Create an NPS Form. |
By Pop-up Action
Select a template based on your preferred target action.
| Cookie request | Asks site visitors for cookie consent. Your visitors can close the pop-up by clicking the button or following the link to read your cookie policy. |
| Call to action | Encourages visitors to take an action, for example, close the pop-up or go to your landing page. |
| Social media subscription | Redirects your site visitors to the selected social media or messaging platform. You can add any number of social media buttons to one pop-up. If you have a chatbot, users will be able to subscribe to it and receive a welcome message. |
| Chat interaction | Allows your site visitors to contact you via a social network or feedback form. |
| Newsletter subscription | Collects your site visitors’ email addresses. |
| Phone request | Collects your site visitors’ phone numbers. |
| Custom form | Collects additional subscriber data. |
Customize Your Pop-up Appearance
Once you choose a template, you will see the opened widget builder in the "Content" tab, where you can edit your widget appearance and change its target action.
Choose whether you want to display an image or not. If you want to display an image, upload a JPG, PNG, or GIF file that is up to 1 MB large, and align it with your text and button: left, right, top, or full screen.
If you selected the "Video" pop-up type, add the link to your Youtube video, and choose when to play it (automatically or after users click on it).

Select your background color (white, black, or colored) and the placement of your pop-up on the page.
You can choose the placement only for pop-ups, video pop-ups (left or right), and long pop-ups (bottom or top).

On the right, you can see what your pop-up will look like on your site.

Add a Message
Enter a context-appropriate message for your site visitors that will encourage them to interact with your pop-up. You can format your text and add links and emoji.
For example, if a visitor has viewed a product page more than three times, your pop-up message can motivate them to make a purchase. Your widget can also help a user calculate the shipping cost when they are exploring your shipping options.

You can also personalize your message with custom variables. Click {}, and select a created variable.
For example, you can address visitors by name, provide unique discount coupons, share recommendations based on users’ previous orders or views, send abandoned cart notifications, or share other data from your system.

Choose a Target Action
Each selected template has its target action users are expected to perform: click on a button, subscribe, or provide contact information.
You can skip this setting or change your target action to remove or add fields and buttons.

The settings may vary based on your selected target action.
| Action | Description | How to set it up |
| No action | Does not add elements of interaction with visitors.
The widget is used only to display information. |
There is no button or input field to configure. |
| Call to action | Encourages your site visitors to take an action, for example, close the pop-up or go to your landing page. | Add your button text, and select what to do when users click it: close the pop-up or redirect them to another page. |
| Subscribe to the messenger | Redirects your site visitor to the selected social media platform.
You can add up to 10 social media links to one pop-up. If you have a chatbot, users can subscribe to it and receive a welcome message. |
Select a social media icon, and enter your button text.
You can also redirect users to your Telegram, WhatsApp, Instagram, and Facebook Messenger chatbot if you have one. |
| Newsletter subscription |
Asks your site visitor to provide their email address. You can also save your contacts to the Email and CRM services. |
Add your hint text to the field where subscribers will provide their contact information, and enter your button name.
To save your contacts to the email service, select "Save to mailing list," and choose a mailing list. If you do not have a mailing list, the service will automatically create one with the name of your project. To save your contacts to your CRM system, select "Create a deal in CRM," and choose a pipeline and stage. When you add deals to CRM, contacts are automatically created in the "Contacts" section. |
| Phone request |
Requests your site visitor's phone number. You can also save your contacts to the Email and CRM services. |
|
| EDU payment |
Displays a course payment form. Contacts who paid are saved to your CRM system. |
Choose a course for which users can pay, and select a payment method. Learn more: How to Receive Payments on Your Course Website. You can also allow students to apply a promo code when paying for your course. To do this, turn on the "Ask for a promo code" toggle, and configure your checkbox display conditions. |
| Custom form |
Requests visitors’ personal data, for example, name, phone number, birthdate, etc. You can also save contacts with custom variables to the email service and your CRM system. |
In the entry field, select a data type, and enter a placeholder. You can also add more elements and link fields with custom variables.
Learn more: How to Set Up a Custom Pop-up Form and How to Transfer Custom Variables. |
| Link |
Redirects users to the specified site page when they click the pop-up. Available only for the “Launcher” template. |
In the "Enter link" field, add a link to the page where users will be directed when they click the launcher. If you want the page to be opened in a new window, select the "Open in new window" checkbox. |
| Open pop-up |
Launches another pop-up on the page when clicked. Available only for the “Launcher” template. |
In the "Choose a pop-up" field, select a pop-up by name from the drop-down list — it will be opened when visitors click the launcher. |
Set Up Additional Options
You can also set up additional pop-up options or select where to save your subscribers’ data. Turn on the corresponding toggle, and set up your elements.
| Open this pop-up upon launcher click | Opens your selected pop-up once a user clicks the launcher
Learn more: How to Create a Launcher Pop-up. |
| Request subscription confirmation |
Sends a confirmation email once a user fills in your email address field. Data will be transferred only after a user confirms their subscription (double-opt-in). You can select an email from the ones created in the subscription tool settings and add a message that will be displayed once a user submits your form. |
| Save to a mailing list | Saves data to your selected mailing list. A variable name will be retrieved from a placeholder or element, and a value will be retrieved from a filled field or a pop-up element a user selected. |
| Create a deal in CRM |
Saves data as a deal and contact to your CRM system. You can select a pipeline, enter a deal name, and choose a deal stage. When contact data points are saved to your CRM system, new contact fields will be created. |
Once you have set up your pop-up appearance and target action, click Next.

Set Up Your Scenario
In the next window, go to the "Targeting" tab. You can track visitor behavior and display the widget only when users perform a certain action, like scroll to a certain part of the page or spend more than 40 seconds on your site.

Condition Types
Select an event and a condition operator to track your site visitors’ behavior, and enter the value you want to track.
| Event | Description | How to configure it |
| Show always |
Your widget will be displayed to users who visit your site without waiting for various conditions to be met. Your pop-up will not be displayed after a user interacts with it. |
|
| UTM Medium |
Tracks the parameter that determines the type of traffic. The widget is displayed only to users with the specified |
Select the "equal to," "not equal to," or "contains" condition.
Enter a value that is equal to or containing the characters of the Possible values:
|
| UTM Content |
Tracks the parameter that determines the part of the page the user came from. The widget is displayed only to users with the specified |
Select the "equal to," "not equal to," or "contains" condition.
Enter a value that is equal to or containing the characters of the Possible values:
|
| UTM Term |
Tracks the parameter that determines the keyword or query phrase that led the user to your site from a search engine. The widget is displayed only to users with the specified |
Select the "equal to," "not equal to," or "contains" condition. Enter a value that is equal to or containing the characters of the |
| UTM Campaign |
Tracks the parameter that determines the name of your advertising campaign. The widget is displayed only to users with the given |
Select the "equal to," "not equal to," or "contains" condition. Enter a value that is equal to or containing the characters of the |
| UTM Source |
Tracks the parameter that determines the traffic source where the user came from. The widget is displayed only to users with the specified |
Select the condition equal to, not equal to, or contains. Enter a value that is equal to or containing the characters of the Possible values:
|
| Traffic type |
Tracks where the visitor came from. The widget is displayed only to visitors from the selected traffic sources. |
Select the "equal" or "not equal" condition. Choose one of these possible types of traffic:
|
| Time on current page |
Tracks the time the user spent on the current page. The widget will be displayed to your site visitor if they spend the specified amount of time on your page. |
Select the "greater than" or "less than" condition. Enter a value that is greater than or less than the duration of the landing page visit in seconds, minutes, or hours. |
| Time on site |
Tracks the time spent on all pages of your site. The widget will be displayed to your site visitor if they spend the specified amount of time on your site. |
Select the "greater than" or "less than" condition. Enter a value that will be greater or less than the duration of the site visit in seconds, minutes, or hours. |
| Number of sessions |
Tracks the number of visitor sessions. The widget will be displayed to the user if the specified number of sessions takes place on your site. |
Select the "greater than" or "less than" condition. Enter a value that is greater than or less than the target number of sessions per user. |
| Scroll over 50% of the page |
Tracks how far the user scrolls the page. The widget will be displayed to your site visitor when they scroll halfway through the page. |
Choose “yes” or “no.” |
| Cursor off screen |
Tracks the mouse cursor movement. The widget will be displayed to your site visitor if they start or do not start moving the cursor to switch to another tab or close the current one. |
Choose “yes” or “no.” |
| Traffic source |
Tracks the page the visitor came from. The widget will be displayed to your site visitor if the given URL matches the referral URL. |
Select the "equal to," "not equal to," or "contains" condition. Enter the page address from which the user came to your site. |
| Current page URL |
Tracks the page the user is currently viewing. You can choose this setting to show (or hide) the pop-up on certain pages of your site. The widget will be displayed to your site visitor after they load the page with the given URL. |
Select the condition equal to, not equal to, or contains. Enter a value that contains the link or part of the link to the current page. |
| URL of the visited page |
Tracks the page the user came from. The widget will be displayed to your site visitor after they load the page with the given URL. |
Select the condition equal to, not equal to, or contains. Enter a value that contains a link or part of a link to the target page. |
| Page title |
Tracks pages by their titles. The widget will be displayed to the user when they visit your page with the same title. |
Select the "equal to," "not equal to," or "contains" condition. Enter a value that is equal to or containing your landing page title characters. |
| Browser |
Tracks the browser and device your site visitor is using. The widget will be displayed to the user when they visit your site from a specific browser or any browser on mobile/desktop. |
Enter a value that matches a browser name or matches all browsers on mobile or desktop. |
| Date period |
Tracks the date when the user visited your site. The widget will be displayed only during the selected dates. |
Select the date interval when the widget will be displayed on your site. A new day begins after 00:00 midnight. Therefore, the night time must be described according to the following formula: “before 23:59”, the “or” operator, “after 00:01.” When you create your widget, your browser time zone is taken into account. However, when it is used, your customers’ time zone is taken into account. |
| Pages visited |
Tracks the total number of pages visited by the user. The widget will be displayed when the user visits more or fewer pages than you specified. |
Select the "greater than" or "less than" condition. Enter a value that will be greater or less than the number of pages visited by the user during the current session. |
| Pages visited in current session |
Tracks the number of pages visited by the user during the current session. The widget will be displayed when the user visits more or fewer pages during one session than you specified. |
Select the "greater than" or "less than" condition. Enter a value that is greater or less than the number of pages visited during the current session. |
| Browser |
Keeps track of the language set in the visitor’s browser settings. You can choose this setting to show (or hide) the pop-up on different language versions of your site. |
Select the "equal to" or "not equal to" condition. Select your browser language from the list. |
| User time period | Tracks the hours when a user visited your website.
The time zone set in your account settings is taken into account. Your widget will be displayed only during the selected time. |
Select the time interval when the widget will be displayed on your website. For example, you can select a promotion period or your business hours — from 6:00 PM to 12:00 AM. |
| Client time period | Tracks the hours when a user visited your website.
Your website visitor’s time zone is taken into account. Your widget will be displayed only during the selected time. |
|
| Show every time you enter the site | Your widget will be displayed to website visitors without previous user interactions with a pop-up and waiting for various conditions to be met. | |
| Show only upon launcher click |
Tracks if a user clicks your launcher. Your widget will be displayed when a user clicks the launcher icon linked to your current pop-up. |
|
| User variable |
Tracks if a user has a certain custom variable value in your contact list. Your widget will be displayed when users have or don't have (depending on the operator you select) the value you enter. |
Select the variable whose value you want to track, and choose an operator:
"equals" — full match of the entered value. "not equals" — does not match the entered value. "contains" — a partial match. "filled" — a variable has any value. "not filled" — a variable is empty. For the "equals," "not equals," and "contains" operators, enter your tracked value. |
| Show only upon button click |
Tracks if a user clicks the submit pop-up button. Your widget will be displayed when users click a button in another pop-up. We recommend using this option when you create flows. |
|
| Show upon element click |
Tracks when a user clicks on a target element. The widget will be displayed when a user clicks the selected element. |
To make your widget appear when a user clicks an element, you need to add a class to that element. To do this, in the pop-up preview, go to the “Code for manual launch” tab. Copy the code that corresponds to the class value, and add it to the element in the website builder. |
| Day of the week |
Tracks the days of the week when the user visits the site. The widget will be displayed when a user visits your website on specified days of the week. |
Select “Show on” or “Don't show on.” Select a day/days of the week. |
| Show periodically |
Tracks a number of times a user visits the site during the selected time period. The widget will be displayed at selected intervals. |
Select a pop-up display interval. You can choose the “Once a day,” “Once a week,” “Once a month,” or “Once a year” option or select “Set period” to customize your interval (in days). |
Binding Operators
And / Or
If you want to add additional values to your current condition type, click the + icon on the right.

Select the "and" or "or" operator.
The "and" operator is used to strictly take into account each value — both the first and the second. If one of the conditions is not taken into account, then the pop-up will not be displayed on your site.
The "or" operator is used to take into account any of the values — the first or second.
Each / Any
You can use different types of conditions and check the information using several parameters at once.
If you want to add another condition, click Add Condition.

Select the order in which the conditions are to be met:
The "each" operator is used to display the pop-up only when all of the specified conditions are met.
The "any" operator is used to display the pop-up when any of the specified conditions are met.

Set the Scenario Name
By default, your project name is generated using the date and time when it is created. To change your project name, click on the corresponding icon next to it.

Publish the Pop-up
Once you have set up all the necessary conditions, click Save and publish.
To make sure that all the changes are displayed in your browser, clear your browser cache and cookies after saving your pop-up
All of your pop-ups are displayed in the "Scenarios on the site" section as separate tabs. Once you create your pop-up, you can view its appearance, track statistics, and edit any setting except for your pop-up type.

Last Updated: 10.11.2023
or